Kitchen glass splashbacks
One joint-free surface behind the hob and along the worktop, templated to your kitchen and toughened before it is painted.
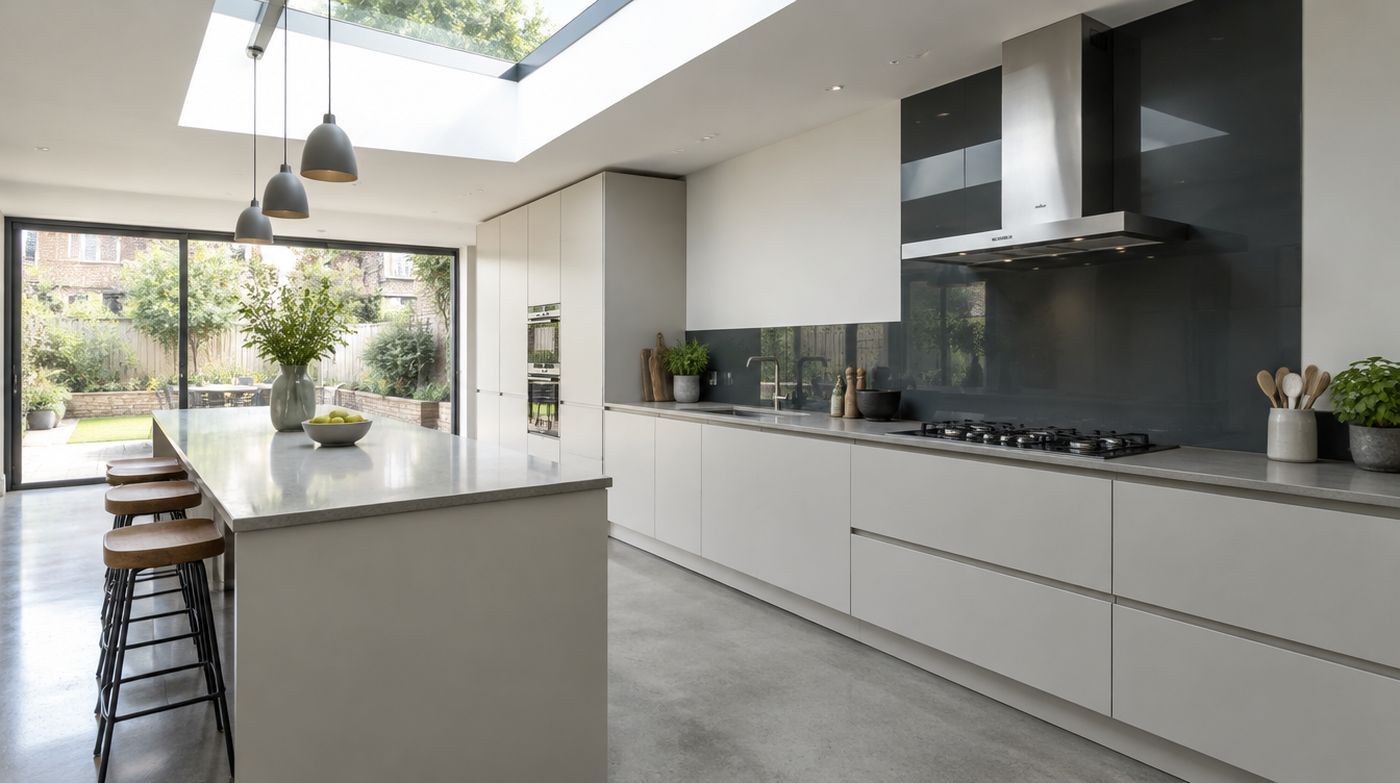
What you are buying when you order kitchen glass splashbacks
Kitchen glass splashbacks are a single sheet of toughened safety glass, cut and notched to your kitchen, back-painted in the colour you choose, then bonded to the wall. Everything that makes the panel fit is done before it is toughened, at our workshop on Atlas Road in Wembley, where the glass is cut, edged, polished, washed, sprayed and put through the furnace by the same people who read the template. Nothing goes out to a third party and comes back reinterpreted.
Six millimetres is the right thickness for almost every kitchen. Four millimetre panels exist and budget suppliers use them: they bow more readily on an uneven wall, they feel thin where an edge is exposed, and the colour has slightly less depth. Eight and ten millimetre glass has a place where a panel is very large with no support, or where a polished edge is a deliberate feature, but paying for it in a normal kitchen buys you nothing you can see.
The glass is toughened to BS EN 12150 and classifies as Class A safety glass to BS 6206, which means that if it ever does break it goes into small blunt granules rather than shards. No building regulation obliges you to use safety glass in a splashback position, because it is not a critical location under Approved Document K. We use it anyway, and so should anybody, for a far more practical reason: annealed glass next to a heat source fails from thermal stress, usually with a crack running out from one edge on a cold morning after a hot evening. Toughened glass does not.
Coloured glass splashbacks in any RAL, Dulux or Farrow & Ball reference
We back-paint to a reference you give us. RAL, BS 4800, Dulux, Farrow & Ball, Little Greene, Mylands: if it has a name and a code, we can match it. The paint sits on the back face, so you are looking at the colour through six millimetres of polished glass, and that is what gives back-painted coloured glass splashbacks the depth you cannot get from a painted wall or a laminate.
Two things change what you actually see. The first is the glass. Standard float carries a green cast from the iron in the mix, and because you are looking through the glass at the paint, that cast lands on top of your colour. It is strongest in whites, pale greys, lilacs and anything with blue in it, and it is effectively invisible in black, navy, charcoal and deep green. The cast also grows with thickness, so six millimetre float shows more of it than four, and it compounds visually along a long evenly lit run. Low iron glass is near colourless and costs a little more. For pale colours it is not an upgrade, it is a requirement.
The second is the sheen of the paint behind it. The same code sprayed in gloss, satin and matt gives three different-looking panels, because the sheen changes how much light comes back through the glass. Gloss reads deeper and darker and reflects the room. Matt reads flatter, lighter and closer to the paint card. We spray samples in the sheen you are considering rather than describing it.
One honest expectation to set. A splashback matched to a Farrow & Ball code will never look identical to the same code in emulsion on the wall beside it. Emulsion is a matt surface scattering light in all directions; the glass is a polished plane returning it. Expect a family resemblance, not a twin. If you need them to read as one colour, go a touch lighter on the glass or choose a satin back.
Glass splashbacks made to measure: why we template instead of measuring
Measuring is writing three numbers on a pad. Templating is recording the actual shape of the opening, and they are not the same activity. On a splashback template we record the bow in the back wall, the level of the worktop across the whole run, the angle each return makes with the back wall, the exact centre and size of every electrical accessory, the hob centreline, the underside of the hood and the shadow line under the wall units.
Kitchens are not rectangles and London kitchens are less rectangular than most. The findings repeat: a back wall bowed four or five millimetres in the middle of a three metre run; a return wall out of square by a degree and a half, which over 700mm of height is most of a centimetre; a worktop falling away towards the end of a long galley. A panel cut to the largest dimension will not go in. A panel cut to the smallest leaves a gap you can see from the doorway.
What a template lets us do is put the tolerance where nobody looks. We hold the top edge a few millimetres clear and let the wall unit shadow line swallow it. We hold the side edges off the returns and run a colour-matched silicone line there. And we go tight along the bottom, against the worktop, because that is the junction your eye lands on every time you stand at the sink. Glass cut to a measurement puts the tolerance wherever it happens to land.
For long runs and complicated returns we take a rigid template rather than relying on dimensions alone, so the workshop is cutting to a physical pattern of your wall. For a simple single panel, careful measurement with laser and level is enough, and we will tell you which your kitchen needs instead of charging you for ceremony.
Socket cut-outs, switch positions and hob clearances
Cut-outs are machined before the glass is toughened. That is the single most important sentence on this page. After toughening, the sheet carries a locked-in stress pattern, and drilling, cutting or notching it releases that stress and reduces the panel to a heap of granules on the worktop. There is no careful way around it and no tradesman on site who can do it for you.
So everything has to be known at template stage: the centre and size of every single and double socket, every grid plate, every fused connection unit, the cooker switch, the extractor isolator, the boiler switch and any late addition for a coffee machine or a wine fridge. Cut-outs are machined with a small radius in each corner, which is both stronger and necessary for the tooling, and sized with a couple of millimetres of clearance all round so the glass is never pinched by a faceplate.
Hob and hood clearances come from the appliance, not from a rule of thumb. Every hob and every extractor has a minimum clearance in its own installation instructions, and that document governs the job. Gas hobs with a burner close to the end of the unit frequently demand more clearance to a side wall than people expect, and induction hobs sometimes specify a minimum to any vertical surface behind. Where the clearance cannot be met, the correct answer is a stainless panel in that zone, or moving the hob, not glass fitted hopefully. Send us the model numbers for the hob and the hood and we will read the instructions rather than guessing.
Behind a range cooker: what changes
A freestanding range changes three things, and all three catch people out.
Heat. The flue slot at the back of a range cooker exhausts hot air straight up the wall above it, and that is a sustained thermal load rather than the occasional splash of a hob. Toughened glass itself is fine. The back paint film is the vulnerable part, so we either specify a paint system rated for it or keep the glass clear of that zone, and if your cooker’s own instructions call for a non-combustible surface directly behind, we will tell you that rather than take the order.
The gap. A range sits in a gap between units with a handful of millimetres either side, and the splashback has to span that gap. If the panel is fitted while the cooker is in place, it physically cannot. So the cooker comes out for the template and again for the fit, which means disconnecting a gas supply through a Gas Safe engineer or a 32 amp cooker circuit through an electrician. That is worth knowing before you book a fitting date, not on the morning.
Removal. Range cookers get pulled out for cleaning and servicing, and the thing that gets damaged is the bottom edge of the glass if the panel runs down to the floor behind the cooker. Where the panel stops on the worktop line either side and bridges the gap above the cooker, there is nothing to catch. Where the client wants glass all the way down, we polish and protect that bottom edge and tell them to lift rather than drag.
Extractors, chimney hoods and the panel behind them
The cleanest result by a long way is to take the hood off the wall, template and fit the panel full width behind it, then refit the hood. The glass is continuous, there is no scribe and nothing to line up. The catch is that fixings through the panel have to be drilled before toughening, in exactly the right place, which means we need the hood’s own paper template or its bracket dimensions at the time we template the wall.
What we more often recommend is simpler. Fit the panel up to the hood and let the chimney sit in front of the glass with a neat silicone line where they meet. There is no drilling, nothing has to align to the millimetre, and the hood can be swapped in ten years without touching the splashback. On a dark panel the junction disappears completely.
The third case is scribing the panel around a hood body that is staying put. It works, it is more expensive because the shape is machined rather than cut, and it is unforgiving: a hood that gets refitted ten millimetres off leaves a visible gap. We will do it, and we will usually suggest one of the other two first.
Canopy hoods hidden inside a wall unit and down-draught extractors in the worktop are the easy ones. The panel simply runs to the underside of the units or up from the worktop as normal, and the only thing to watch is the isolator switch, which is a cut-out like any other.
How is a glass splashback fixed to the wall, and can it be removed?
Kitchen glass splashbacks are bonded, not screwed. We apply a low modulus neutral cure silicone or a hybrid polymer adhesive in vertical beads to the back of the panel, bed it to the wall, press it home, support the bottom edge on packers off the worktop while it cures, and then run the perimeter silicone. There are no visible fixings and no trims, which is most of the appeal.
Wall preparation decides whether that bond lasts. The surface has to be dry, dust-free, sound and reasonably flat. Fresh plaster has to be properly dry, because bonding to plaster that is still giving up moisture produces a panel that works loose a year later. Old tile adhesive, flaking paint, wallpaper and the chalky remains of a previous upstand all have to come off. In a dot-and-dab wall we tap for hollows, because bonding a thirty kilogram panel to a sheet of plasterboard that drums over a void is optimistic, and we will either add support behind or tell you the wall needs work first.
Removal is honest news badly delivered: assume the panel does not survive it. Cutting the silicone line and working a thin blade or a wire behind a bonded sheet usually ends in a broken panel, especially on anything over a metre. That is not a flaw in the product, it is the reason the decisions at the front of this page matter so much. If something on that wall is likely to change, say so at survey and we will design the run so one panel can be replaced on its own.
Joints, silicone colour and movement
A long run gets a joint when it has to, for one of four reasons: the sheet size available, the physical route into the kitchen, a change of plane, or deliberate risk management around a socket zone. A joint is a two to three millimetre silicone line between two polished edges, colour-matched to the glass. It is not invisible. On a mid or dark colour it reads as a shadow and people stop seeing it within a week; on a brilliant white it is more noticeable, and that is worth knowing before you choose white and insist on a four metre wall in two pieces.
We do not butt two panels together dry. It looks marginally cleaner on day one and it is a bad detail: the polished edges touch, they chip each other with the smallest movement, and there is an open seam for water to sit in. A thin silicone line is the correct joint.
Silicone colour is a detail people never think about and always notice afterwards. We match the perimeter silicone to the glass on the vertical edges and the top, and to the worktop along the bottom line, because that is where the eye reads a horizontal. Clear silicone against a dark panel is the classic mistake: it goes grey within a year and makes a good panel look dirty.
Acetic cure silicone attacks back paint. If the tube smells of vinegar when you open it, it is acetoxy cure and it has no business near a painted glass panel. The damage does not appear straight away. It shows up months later as a pale halo creeping in from the silicone line, and by then nobody remembers which tube was used. Neutral cure only, and that includes whatever your kitchen fitter uses to seal the worktop to the wall underneath the glass. Tell them, because they will reach for what is in the van.
Glass upstands, window reveals and the awkward bits
Glass upstands are a hundred millimetre band along the back of the worktop instead of a full height panel. They are the right answer more often than the industry admits: along a run with no hob, under a window where a full panel has nowhere to go, where you are keeping a tiled or panelled feature, or simply where the budget is better spent elsewhere. They are cheaper, dramatically easier to carry into a third floor flat, and they can be matched to a full height panel behind the hob. Upstands everywhere plus one full height panel behind the cooker is a sensible layout and we specify it regularly.
Window reveals are the fiddly part of any kitchen with a window in the run. The two cheeks and the sill each get their own piece with polished edges, and each has to be templated separately because reveals are never square and the sill is almost never level. Done properly it is a real improvement: the reveal becomes wipeable, the window is easier to clean, and the perennial damp patch where the sill meets the tiles behind a tap simply has nowhere to form.
The same approach handles a chimney breast, a boxed-in soil pipe or a nib left by an old doorway. Each face is a pane, each junction is a silicone line, and each needs templating. It also means a kitchen with five short returns is a different and more expensive job than a kitchen with one long wall, which is the honest reason two quotes for a similar amount of glass can be a long way apart.
Printed glass splashbacks: what artwork do you need?
Printed glass splashbacks are digitally printed onto the back face and then backed with white or a colour so the image reads strongly rather than looking washed out against the wall. Almost any image can be printed. The two things that decide whether it looks good are resolution and composition.
On resolution, work to roughly 100 to 150 dots per inch at the finished size. A panel 2,500mm long by 650mm high therefore wants a file somewhere in the region of 10,000 by 2,500 pixels. A photograph straight off a phone, typically four thousand pixels wide, prints perfectly well at a metre and looks soft at three. Send us a TIFF, a layered PSD or a high quality JPEG, tell us the crop you want, and if the image came off a website rather than a camera, tell us that too and we will be straight with you about how it will look.
On composition, a splashback is an extremely long thin crop and most images are not. Abstract, textural and large-pattern images survive it. A landscape with a strong focal point rarely does, because the focal point ends up behind the kettle. We produce a proof with your socket cut-outs marked on the image so you can see exactly what the faceplates are going to cut through before anything is printed.
Honest view: plain colour ages better than print. The printed panels that still look right years later are the quiet ones. If you want texture rather than a picture, acid-etched, fluted and metallic-backed glass give you interest without a subject matter you might get tired of.
Bathroom glass splashbacks, utility rooms and cloakrooms
Bathroom glass splashbacks solve a narrower problem than kitchen ones: the grout joint directly behind a basin tap, where water stands every day and no amount of cleaning keeps it white. A single panel from the back of the basin up to the underside of a mirror, bonded and siliconed only at the bottom, has nothing in it to go black.
Utility rooms are the easiest win in the house. A panel behind the sink and across the back of the worktop where the washing machine sits takes the splashing, wipes clean in one pass, and is usually a small enough piece to be genuinely inexpensive. The same applies behind a Belfast sink or beside a boiler, where the wall takes more punishment than anybody admits.
One clear boundary: a splashback is not a shower panel. Glass-lined walls inside a shower enclosure are a different product with different fixing, different silicone and real attention needed at the floor junction, and treating a splashback as a cheap version of it causes leaks behind the glass. If that is what you want, say so at survey and we will specify it properly or tell you we are not the right people for it.
Clear and low iron glass over an existing finish
Sometimes the right answer is clear glass over whatever is already on the wall. Original Victorian tiles you like but cannot get clean. A wallpaper in a utility you want to protect. A brick wall in a side-return extension that a client is not willing to cover. A polished plaster finish. Clear toughened glass on top gives you a wipeable surface and leaves what is underneath completely visible.
Use low iron glass for this every time. Standard float over white tiles makes them look faintly swimming-pool green, and the effect is much more obvious than on a coloured panel because there is no colour to disguise it. The cost difference on a domestic sized panel is small and the difference in the result is total.
Two cautions and both are absolute. Whatever is behind the glass is sealed in and visible forever, including the dust in the grout lines and the hairline crack in the plaster, so it gets cleaned properly first or not at all. And if there is any suspicion of damp in that wall, do not do it. Glass over damp traps the moisture and you will be looking at it through a polished window.
Cleaning back-painted glass, and what to keep away from it
The whole routine is warm water, a drop of washing up liquid, a microfibre cloth and a dry cloth afterwards. That is it. A glass cleaner with a little alcohol in it is fine on the front face and good for removing grease above a hob.
What does damage, in order of how often we see it. Cream cleaners and abrasive pastes, which micro-scratch the polished face: you will not see it on day one, and on a dark gloss panel the scratches build into a permanent haze that catches the downlights. Scouring pads and metal scrapers, for the same reason. Limescale removers and oven cleaner overspray left to dwell along the silicone line, because that is where the painted face is exposed. And ammonia-heavy cleaners used repeatedly on the joints.
The simple version of all of that: be as rough as you like in the middle of the panel with a soft cloth, and keep anything aggressive off the edges. For limescale around a tap on a bathroom panel, a weak citric acid solution, worked and rinsed, beats a thick gel left on overnight.
Survey, lead time and getting a price
A survey for kitchen glass splashbacks is free anywhere in London. One of our own team comes out, templates or measures depending on what the kitchen needs, records every cut-out and clearance, checks the wall for flatness and bond, and goes through colours against sprayed samples rather than a printed card. You get a written fixed quotation listing panel sizes, glass type, colour reference and sheen, every cut-out, upstands and returns, silicone colour, and who is removing the old finish and making good.
After templating, allow roughly one to two weeks for manufacture. The glass is cut, the cut-outs machined, the edges arrised and polished, the sheet washed, primed, sprayed, cured and then toughened, and the toughening is the step nobody can rush. Fitting a typical kitchen is a half day.
If you are a kitchen fitter or designer looking for glass splashback fitters in London who will work to your programme rather than their own, that is most of what we do. We will hold finished panels at the workshop until your kitchen is ready, we will template around your worktop date, and we will not turn up and template a kitchen that is not finished enough, which saves both of us a wasted visit. Call 020 4634 6045, Monday to Friday, 8am to 5pm. The workshop is at 6 Atlas Road, Wembley, London HA9 0JH if you would rather come and see glass being cut and look at sample panels in daylight.
FAQ
Questions we get asked
How much do glass splashbacks cost?
Price follows area, glass type and the number of cut-outs. A single panel behind a hob is modest. A full run along a worktop in low-iron glass with several socket cut-outs costs more, and a printed panel more again. Low-iron glass is a worthwhile uplift on pale colours and a waste of money on dark ones. We price from the template with fitting included.
Can you match any colour?
Any RAL, Dulux or Farrow & Ball reference, and most other paint systems. One caveat worth knowing: the glass itself affects how the colour reads. Standard float glass has a green cast that pushes whites towards cream and greys towards olive. On pale colours we recommend low-iron glass and we confirm the colour on a glass sample before anything is painted.
Can a glass splashback go behind a gas hob?
Yes, provided it is toughened — which everything we make is. Toughened glass handles the thermal cycling behind a hob without complaint. The thing to observe is the hob manufacturer's stated minimum clearance between the burner and a vertical surface, which varies by model. Tell us the hob and we will set the glass to suit it.
Do you have to remove the old tiles?
Not necessarily. If the tiled surface is sound, flat and the tiles are not heavily textured, glass can be bonded straight over them. The thickness just moves the face of the wall forward a little, which occasionally matters at a socket or a window reveal. If the tiles are loose or very uneven, they are better off.
How long does it take?
Templating takes about half an hour. Making the glass is typically one to two weeks — cut, toughened, painted and cured, each step with its own curing time. Fitting is usually an hour or two. Printed panels take a little longer because artwork needs approving before print.
What about joints on a long run?
A single pane is best and we make them as large as transport and access allow. Beyond that, a run is made in sections with a butt joint rather than a visible trim, sealed with a colour-matched silicone. On a back-painted splashback the joint is barely noticeable; we will show you where joints would fall at the template stage so there are no surprises.
Get a price for your splashback
Send the rough size and the colour you have in mind. We will template on site across London and confirm the colour on glass before anything is made.